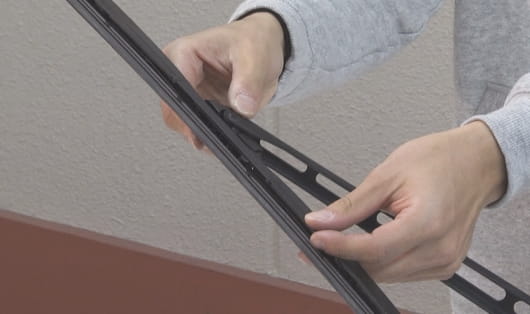
Replacing wiper blades and rubber

Replacing
Multi-use wiper blades
Before replacement
- After opening the package, check that the wiper rubber of this product has not come off and that there are no deformed or missing parts.
- Stop the engine and make sure the wiper switch is OFF.
- Remove traffic film and dirt from the glass beforehand.
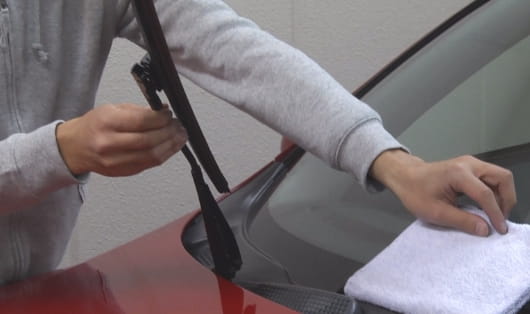
- Please work on the glass and body with a soft cloth or similar material to prevent scratches.
How to replace
- After opening the package, check that the wiper rubber of this product has not come off and that there are no deformed or missing parts.
- Stop the engine and make sure the wiper switch is OFF.
- Remove traffic film and dirt from the glass beforehand.
- Please work on the glass and body with a soft cloth or similar material to prevent scratches.
-
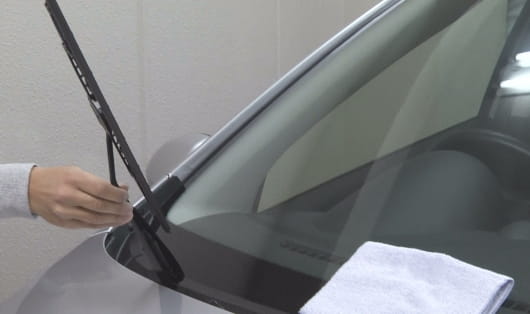
STEP 01
Stand the arm up.
Stand up the wiper arm.
-
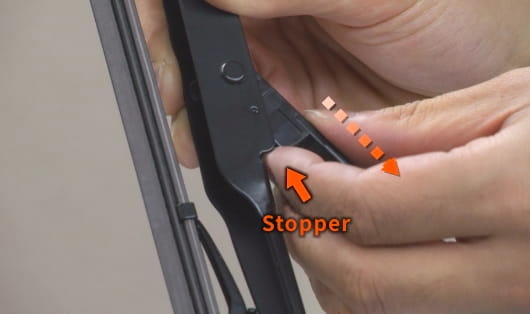
STEP 02
Remove the blade.
While pressing the stopper, slide the wiper blade in the direction of the arrow and remove it.
-
STEP 03
Attach adapter B1 to the wiper blade.
Insert the supplied adapter B1 until it clicks into place.
- R type: The tip of the adapter is on the "Glaco" mark side of the Glaco wiper L type: The base of the adapter is on the "Glaco" mark side of the Glaco wiper

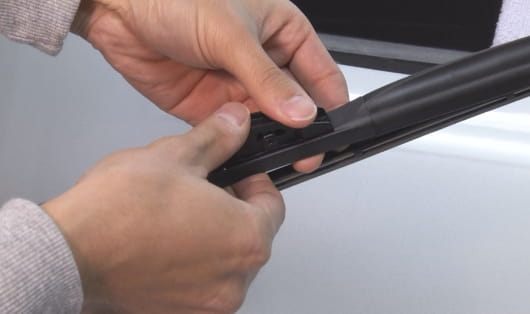
- R type: The tip of the adapter is on the "Glaco" mark side of the Glaco wiper L type: The base of the adapter is on the "Glaco" mark side of the Glaco wiper

-
STEP 04
Install new blades and you are done.
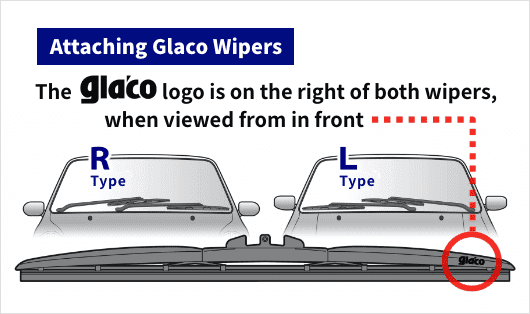
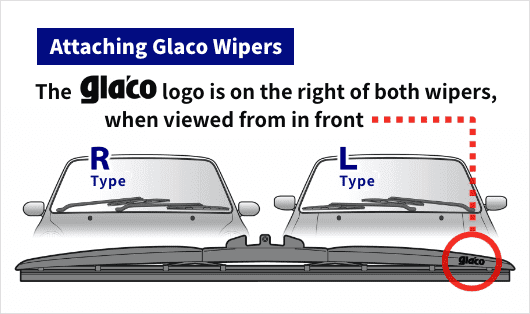
For both R and L types, the "Glaco" mark should be on the right side when viewed from the hood side.
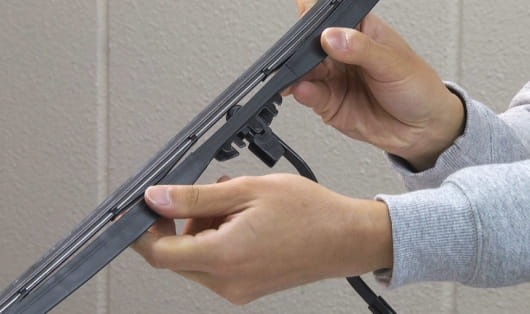
Hook the adapter to the U-shaped hook on the wiper arm.
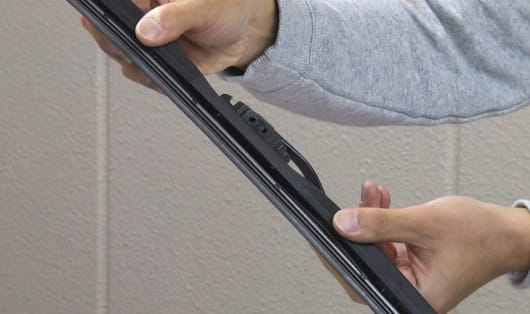
Rotate the wiper blades approximately 90 degrees.
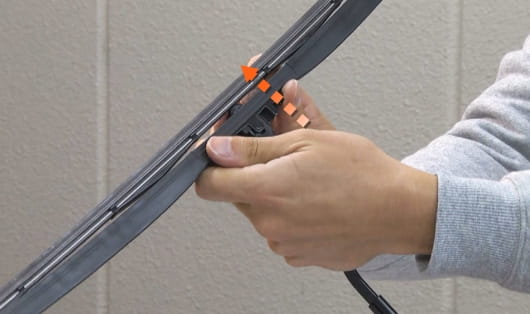
Insert it in the direction of the arrow. Be sure to check that it snaps into place.
-
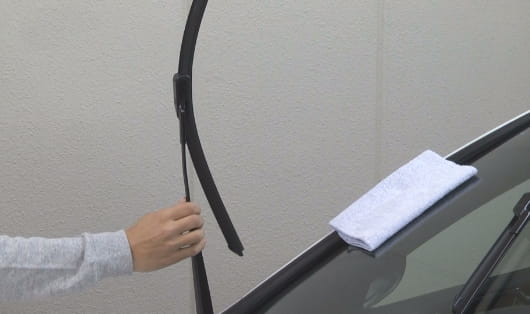
STEP 01
Stand the arm up.
Stand up the wiper arm.
-
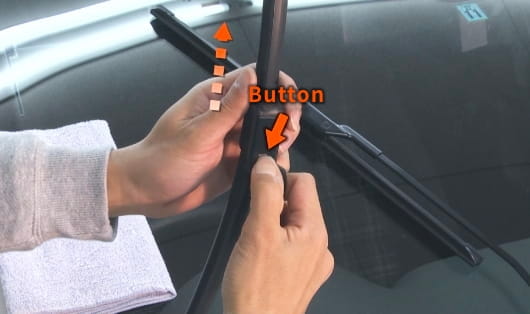
STEP 02
Remove the blade.
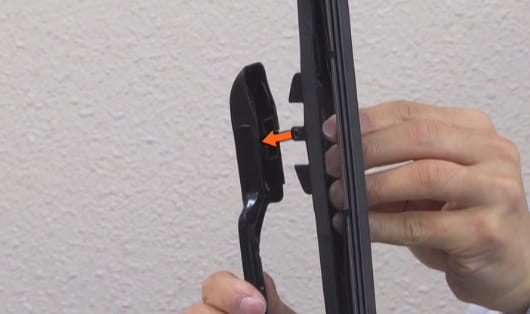
While pressing the button, pull in the direction of the arrow to remove it.
-
STEP 03
Attach the adapter TL-2 to the wiper arm.
Attach the supplied adapter TL-2 to the wiper arm.
- *Check the "R" marking. If your car is an L type, remove the cap while pressing the button on the supplied TL-2 adapter and install the cap on the opposite side so that the L imprint is visible.
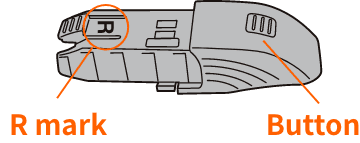
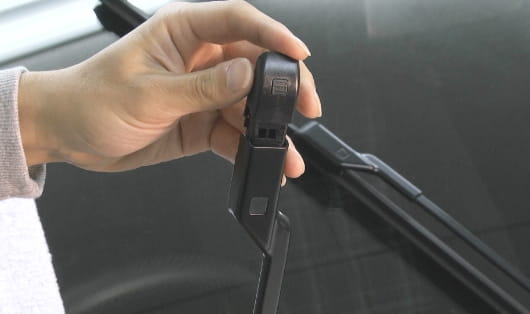
- *Check the "R" marking. If your car is an L type, remove the cap while pressing the button on the supplied TL-2 adapter and install the cap on the opposite side so that the L imprint is visible.

-
STEP 04
Install new blades and you are done.
For both R and L types, the "Glaco" mark should be on the right side when viewed from the hood side.
Insert the wiper blade into the wiper arm with the adapter attached. Be sure to check that it snaps into place.
-
STEP 01
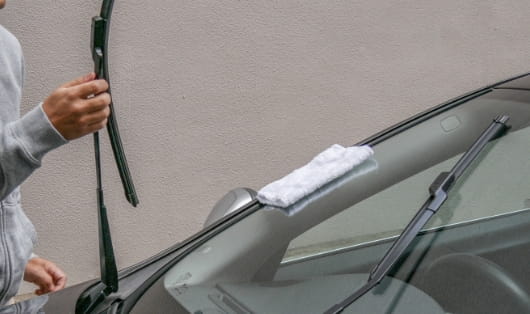
Stand the arm up.
Stand up the wiper arm.
-
STEP 02
Remove the blade.
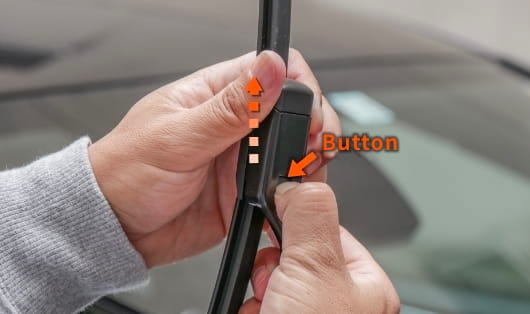
While pressing the button, pull in the direction of the arrow to remove it.
-
STEP 03
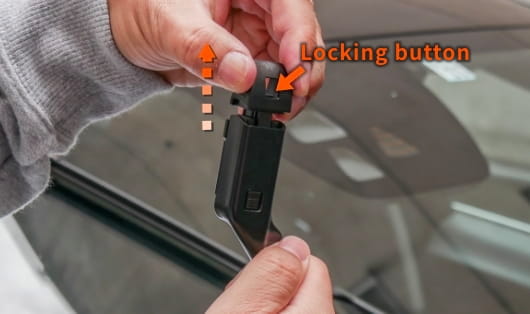
Attach the adapter TL-2B to the wiper arm.
Insert the supplied adapter TL-2B into the wiper arm.
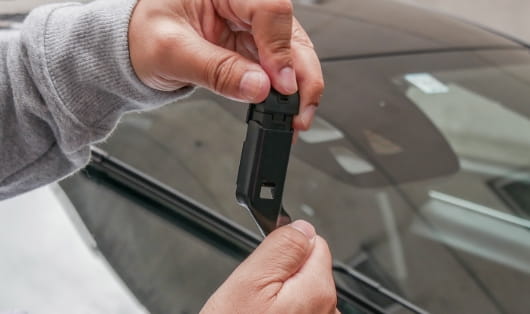
Slide the tip part in the direction of the arrow while pressing the lock button on the adapter.
-
STEP 04
Install new blades and you are done.
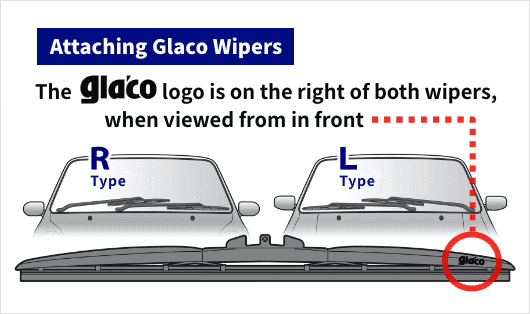
For both R and L types, the "Glaco" mark should be on the right side when viewed from the hood side.
Insert the wiper blade into the wiper arm with the adapter attached until it clicks into place.
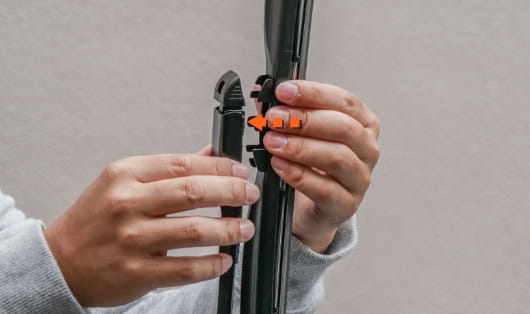
Slide the tip part of the adapter in the direction of the arrow until it clicks into place and locks.
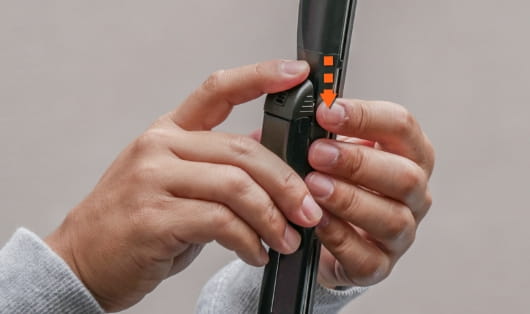
-
STEP 01
Stand the arm up.
Stand up the wiper arm.
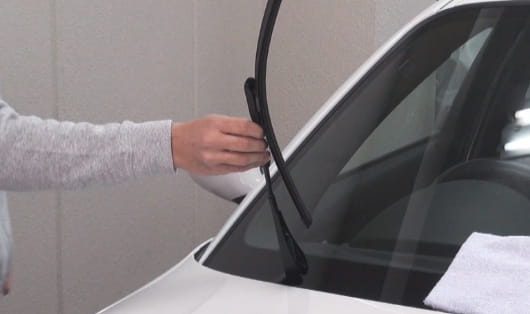
-
STEP 02
Remove the blade.
Pinch the left and right stoppers and move them in the direction of the arrows to remove them.
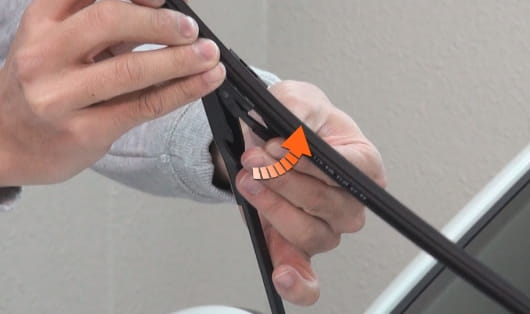
-
STEP 03
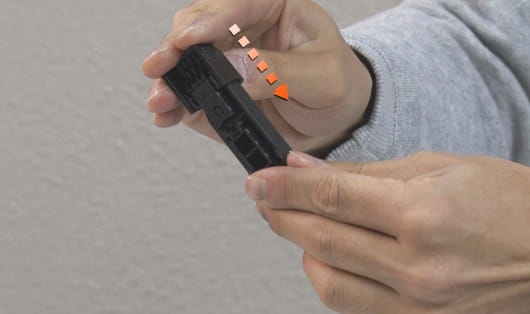
Attach the PT-3 adapter to the wiper arm.
Slide the cap of the supplied PT-3 adapter to the position of the wiper arm and install it.
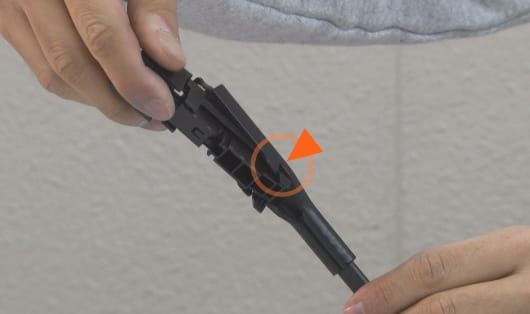
Slide and lock the cap.
-
STEP 04
Install new blades and you are done.
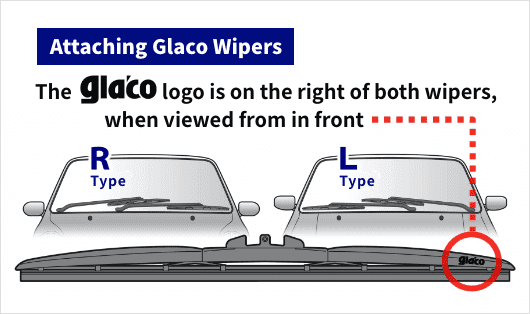
For both R and L types, the "Glaco" mark should be on the right side when viewed from the hood side.
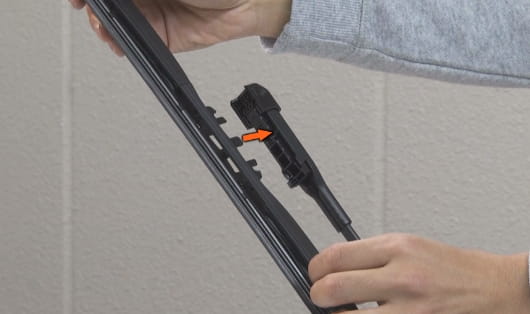
Insert the wiper blade into the wiper arm with the adapter attached. Be sure to check that it snaps into place.
-
STEP 01
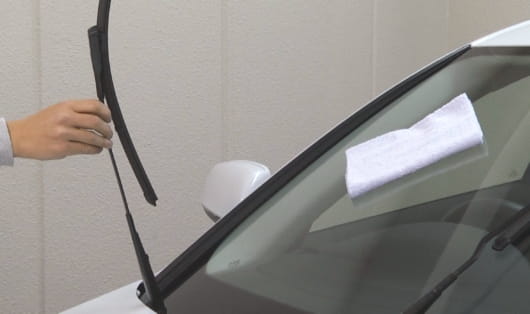
Stand the arm up.
Stand up the wiper arm.
-
STEP 02
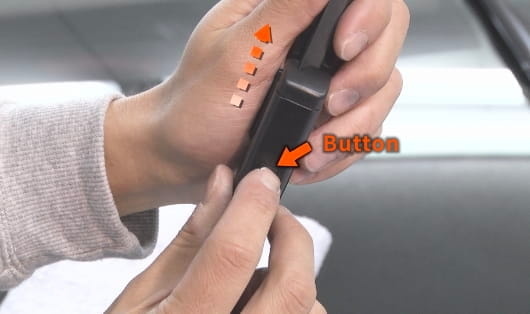
Remove the blade.
While pressing the button, pull in the direction of the arrow to remove it.
-
STEP 03
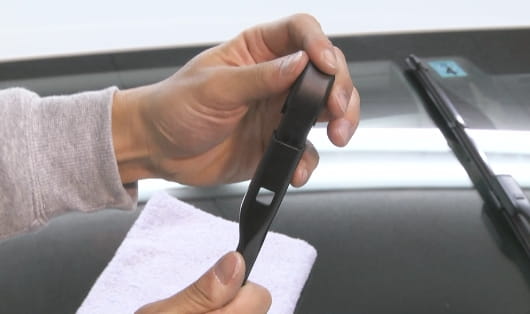
Attach the "TL-4" or "TL-4a" adapter to the wiper arm.
Attach the supplied "TL-4" or "TL-4a" adapter to the wiper arm.
-
STEP 04
Install new blades and you are done.
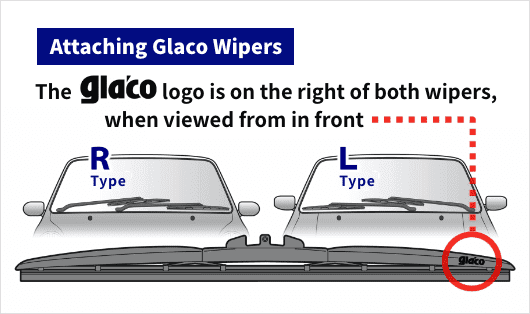
For both R and L types, the "Glaco" mark should be on the right side when viewed from the hood side.
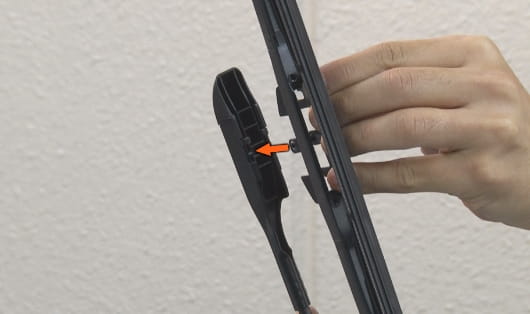
Insert the wiper blade into the wiper arm with the adapter attached. Be sure to check that it snaps into place.
-
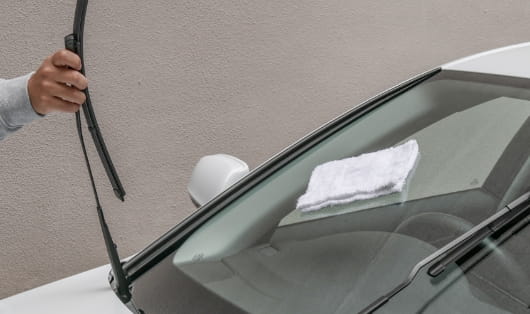
STEP 01
Stand the arm up.
Stand up the wiper arm.
-
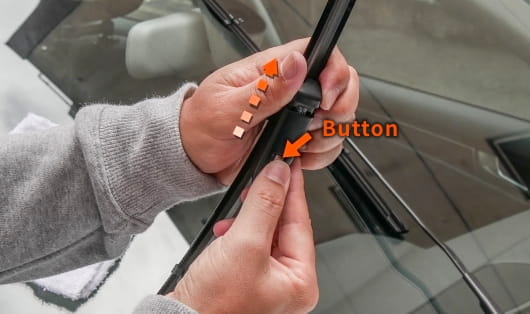
STEP 02
Remove the blade.
While pressing the button, pull in the direction of the arrow to remove it.
-
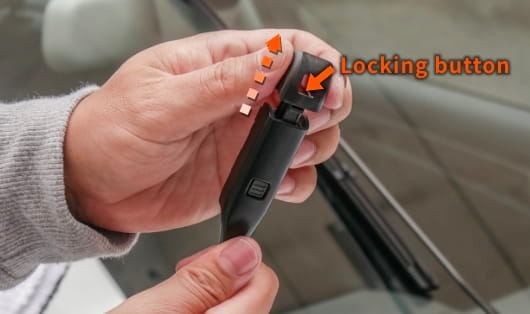
STEP 03
Attach the adapter TL-4B to the wiper arm.
Insert the supplied adapter TL-4B into the wiper arm.
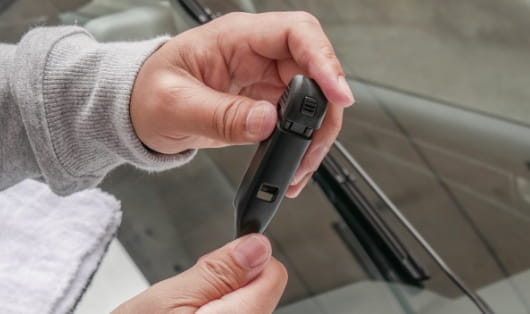
Slide the tip part in the direction of the arrow while pressing the lock button on the adapter.
-
STEP 04
Install new blades and you are done.
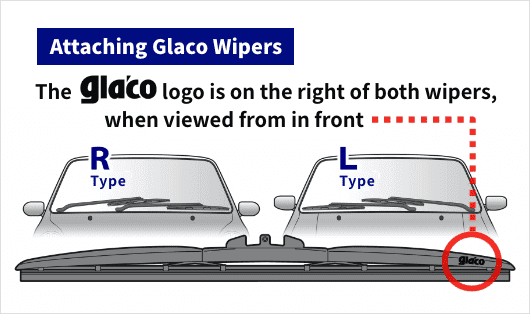
For both R and L types, the "Glaco" mark should be on the right side when viewed from the hood side.
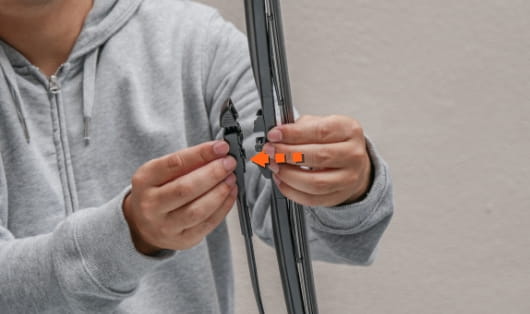
Insert the wiper blade into the wiper arm with the adapter attached until it clicks into place.
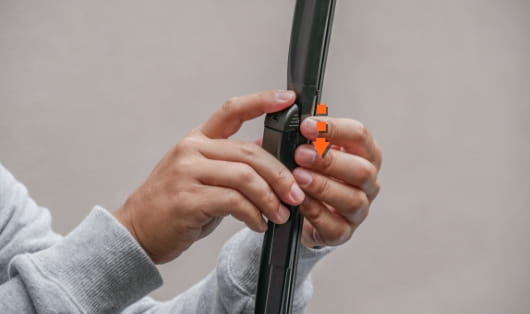
Slide the tip part of the adapter in the direction of the arrow until it clicks into place and locks.
-
STEP 01
Stand the arm up.
Stand up the wiper arm.
-
STEP 02
Remove the blade.
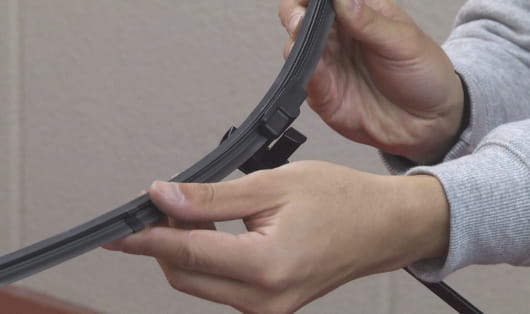
Rotate the wiper blade approximately 90 degrees and pull it out. If there is a cover, push the hook on the back side of the cover and remove the cover.
-
STEP 03
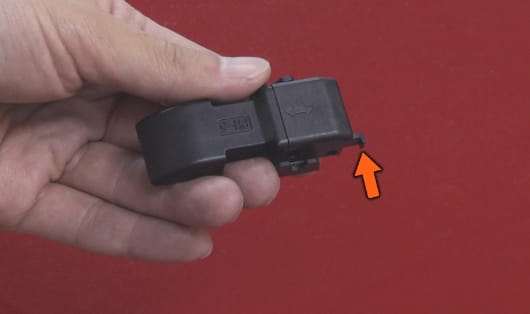
Attach the PH-5 adapter to the wiper arm.
Hold down the arrow on the included PH-5 adapter.
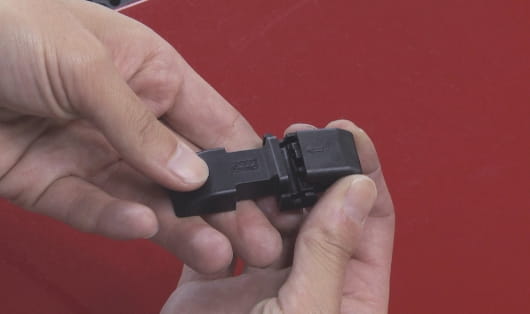
Slide the cap
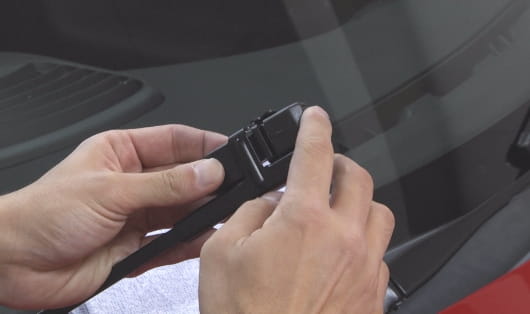
Attach the adapter to the wiper arm and lock the cap.
-
STEP 04
Install new blades and you are done.
For both R and L types, the "Glaco" mark should be on the right side when viewed from the hood side.
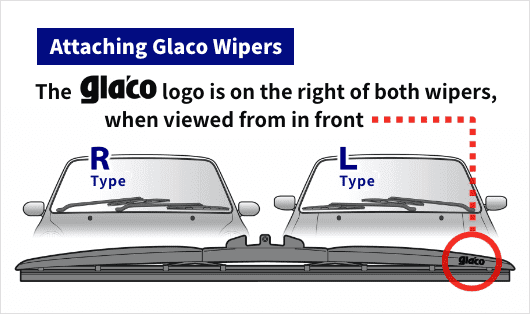
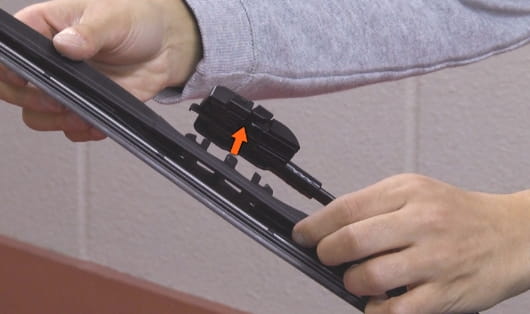
Insert the wiper blade into the wiper arm with the adapter attached. Be sure to check that it snaps into place.
-
STEP 01
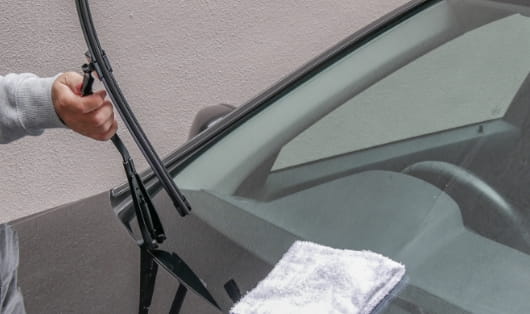
Stand the arm up.
Stand up the wiper arm.
-
STEP 02
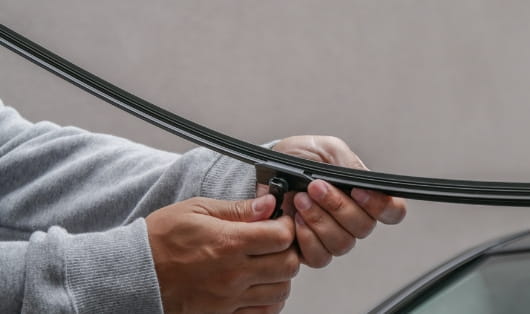
Remove the blade.
Rotate the wiper blade approximately 90 degrees and pull it out. If there is a cover, push the hook on the back side of the cover and remove the cover.
-
STEP 03
Attach the PH-5B adapter to the wiper arm.
Slide the cap of the supplied PH-5B adapter in the direction of the arrow.
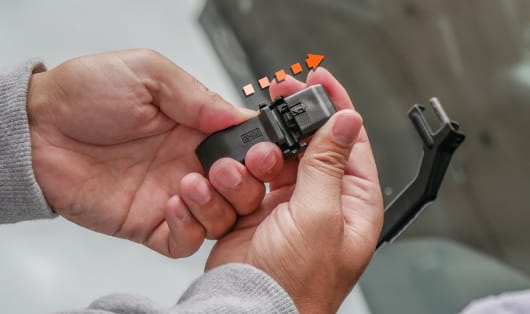
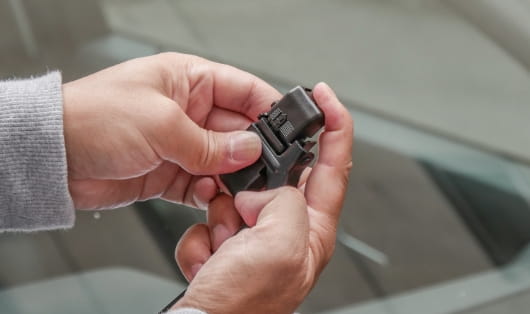
Attach the PH-5B adapter to the wiper arm and lock the cap.
-
STEP 04
Install new blades and you are done.
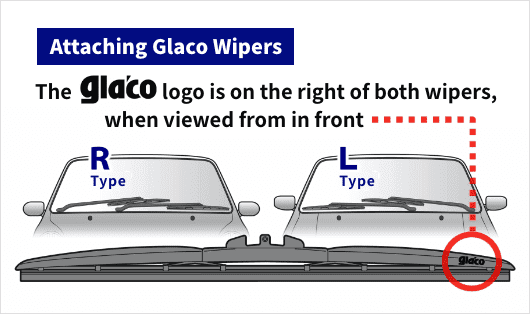
For both R and L types, the "Glaco" mark should be on the right side when viewed from the hood side.
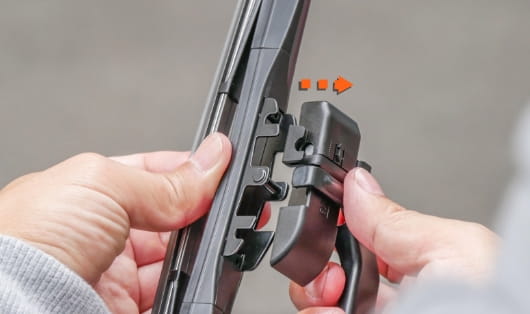
Insert the wiper blade into the wiper arm with the adapter attached. Be sure to check that it snaps into place.
-
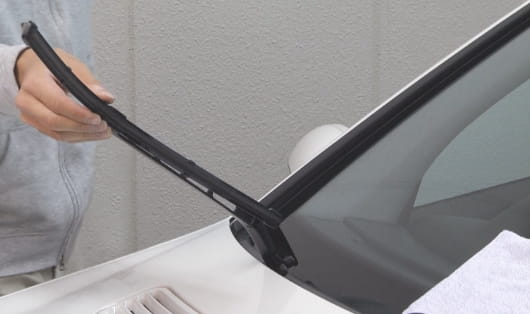
STEP 01
Stand the arm up.
Stand up the wiper arm.
-
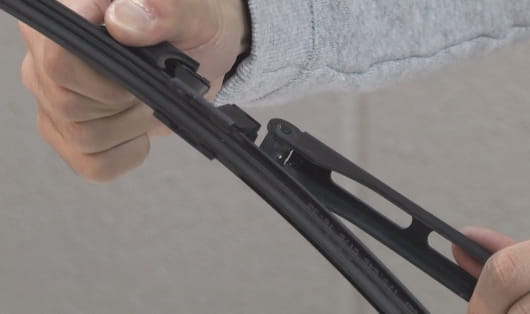
STEP 02
Remove the blade.
Remove the wiper blade cover by grasping it and pulling.
-
STEP 03
Attach the adapter CL to the wiper blade.
Insert the supplied adapter CL until it clicks into place.
- R type: The tip of the adapter is on the "Glaco" mark side of the Glaco wiper L type: The base of the adapter is on the "Glaco" mark side of the Glaco wiper

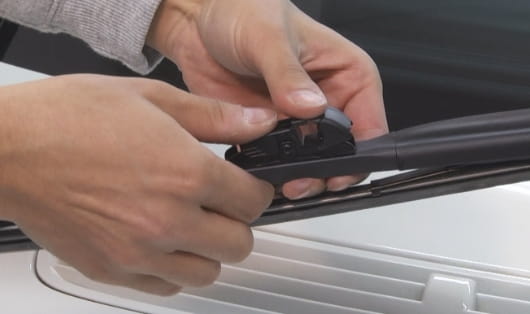
- R type: The tip of the adapter is on the "Glaco" mark side of the Glaco wiper L type: The base of the adapter is on the "Glaco" mark side of the Glaco wiper

-
STEP 04
Install new blades and you are done.
For both R and L types, the "Glaco" mark should be on the right side when viewed from the hood side.
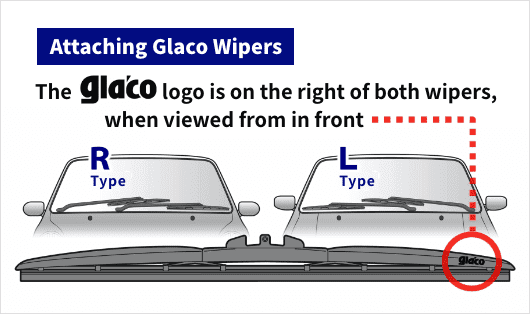
Open the adapter cover.
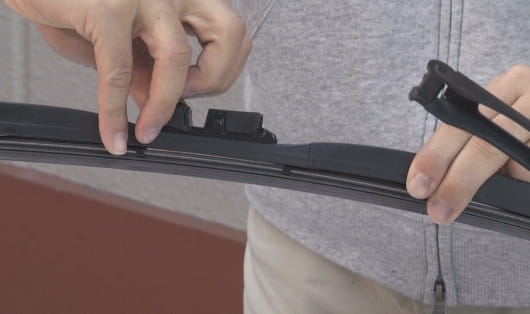
To match the shape of the arrow part.
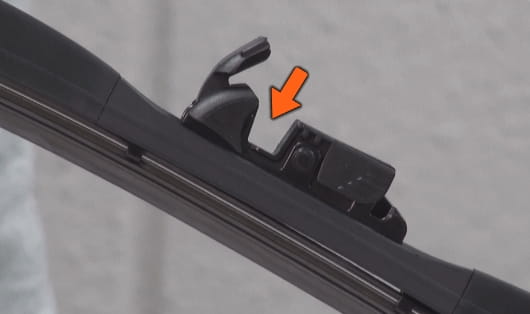
Rotate the tip of the wiper arm to align it.
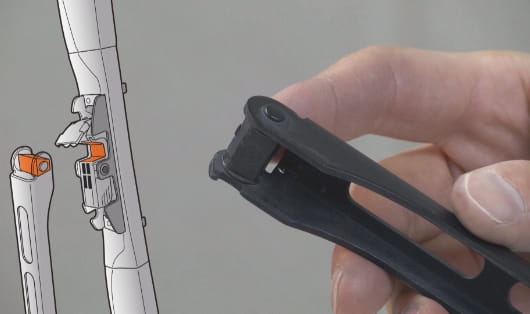
Snap the wiper blade into the wiper arm and close the cover until it clicks into place.
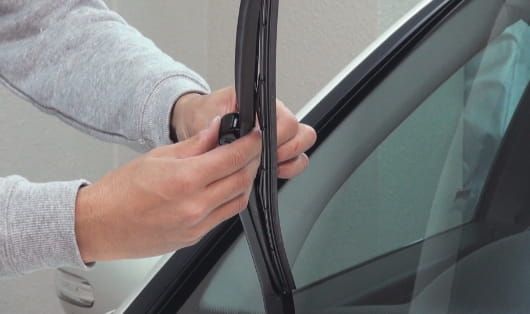
Replacing
Multi-use wiper rubber
Before replacement
This product is a replacement rubber exclusively for Glaco Multi-Fit Wipers. Please note that this product cannot be attached to original wipers or other products.
Before replacement work
- Stop the engine and make sure the wiper switch is OFF.
- Remove oil film and dirt from the glass beforehand.
- Please work on the glass and body with a soft cloth or similar material to prevent scratches.
-
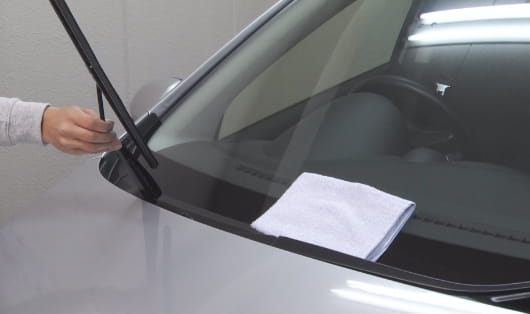
STEP 01
Stand the arm up.
Remove and work on the wiper blades.
-
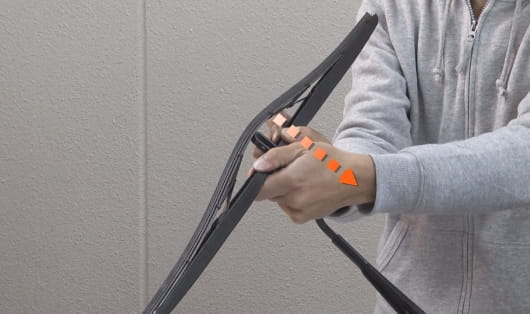
STEP 02
Remove the blade.
Rotate the wiper blade approximately 90 degrees and pull in the direction of the arrow to remove it.
-
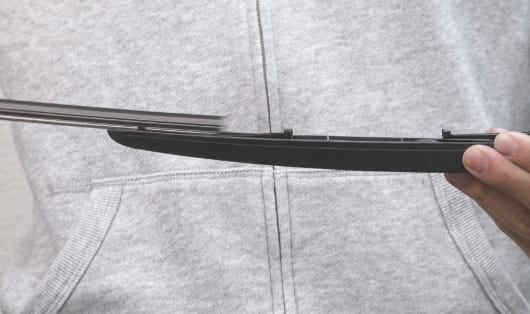
STEP 03
Pull out the old wiper rubber.
Pull it out with the metal rail from the side with the lock hole.
-
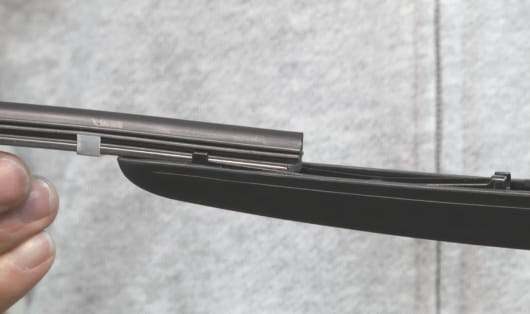
STEP 04
Insert new wiper rubbers.
Insert the old rubber from the side without the lock hole.
-
STEP 05
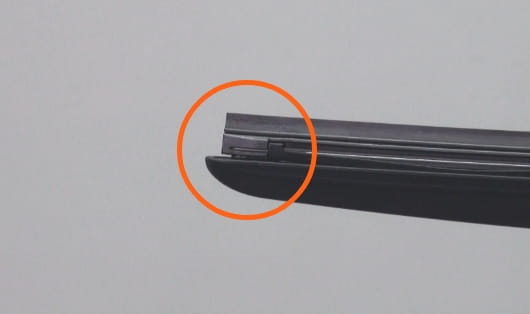
Insert the blade claws into the rubber.
Insert the claws into the locking holes.
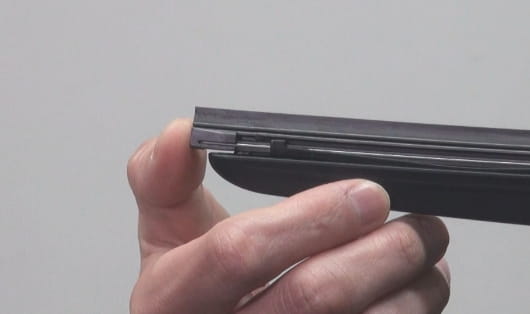
Make sure metal rails are not displaced.
-
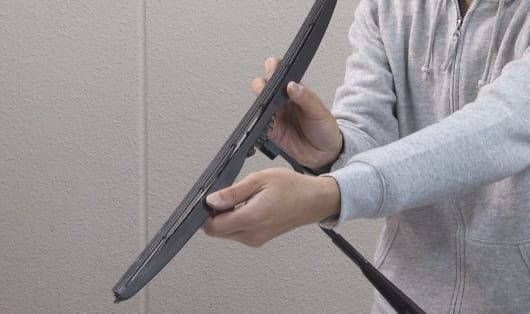
STEP 06
Attach the blade to the arm and you're done!
Attach the blade to the arm and the work is complete.
-
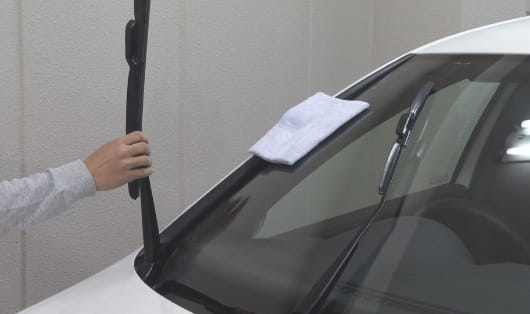
STEP 01
Stand the arm up.
Remove and work on the wiper blades.
-
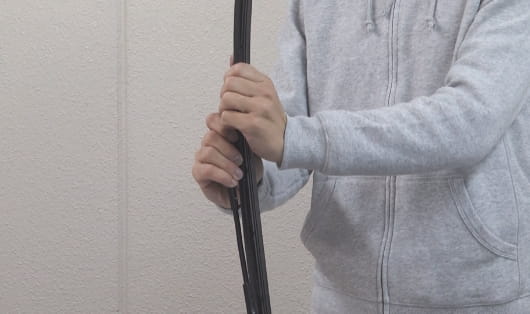
STEP 02
Remove the blade.
Remove the wiper blade by pulling it with a slight twist.
-
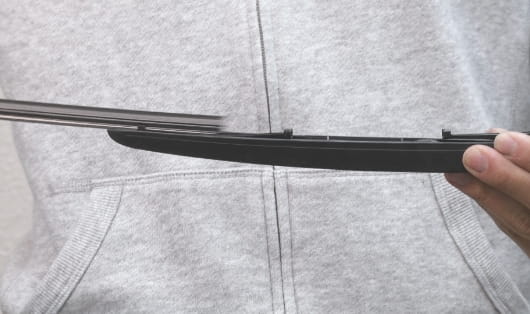
STEP 03
Pull out the old wiper rubber.
Pull it out with the metal rail from the side with the lock hole.
-
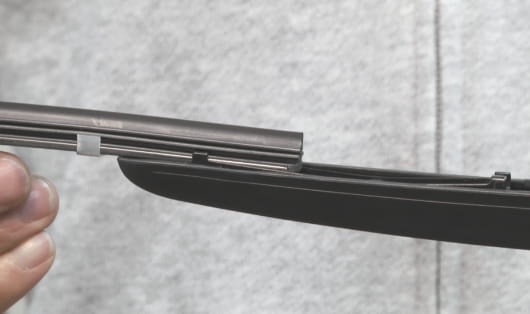
STEP 04
Insert new wiper rubbers.
Insert the old rubber from the side without the lock hole.
-
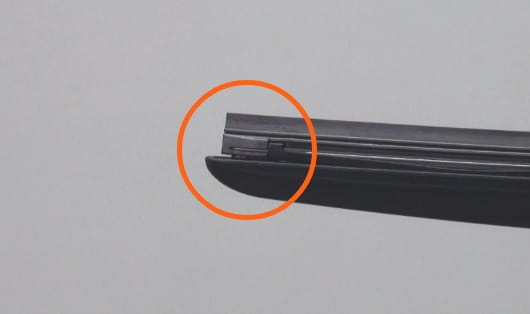
STEP 05
Insert the blade claws into the rubber.
Insert the claws into the locking holes.
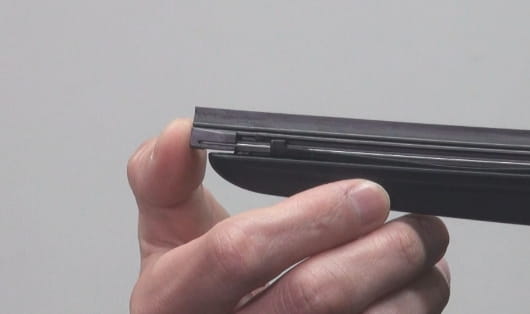
Make sure metal rails are not displaced.
-
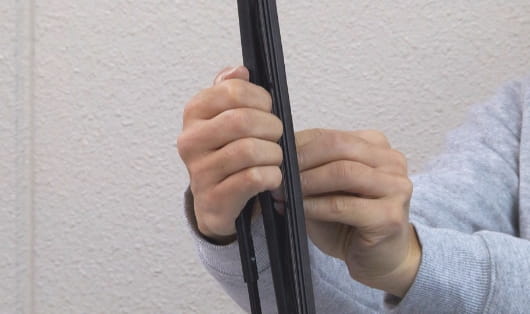
STEP 06
Attach the blade to the arm and you're done!
Attach the blade to the arm and the work is complete.
-
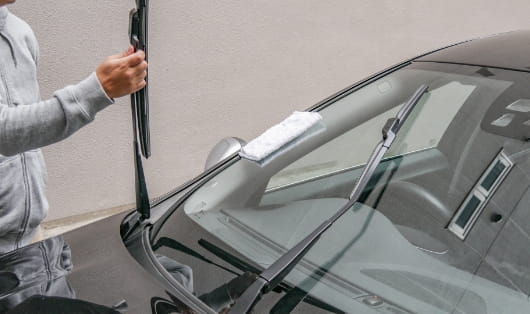
STEP 01
Stand the arm up.
Remove and work on the wiper blades.
-
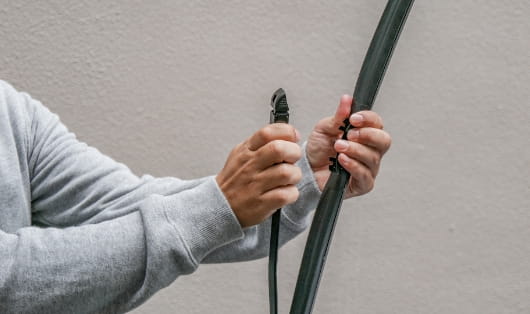
STEP 02
Remove the blade.
Slide the tip part of the adapter to unlock it.
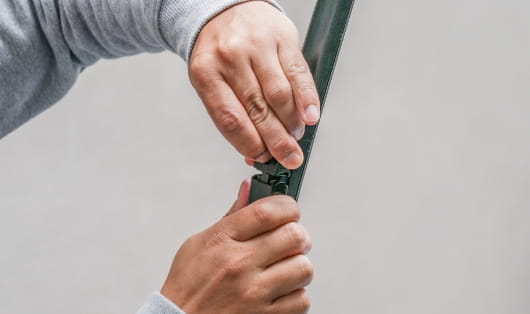
Remove the wiper blades.
-
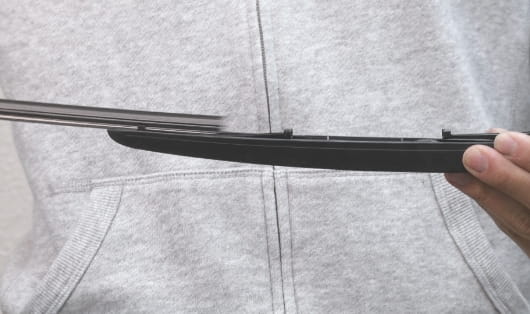
STEP 03
Pull out the old wiper rubber.
Pull it out with the metal rail from the side with the lock hole.
-
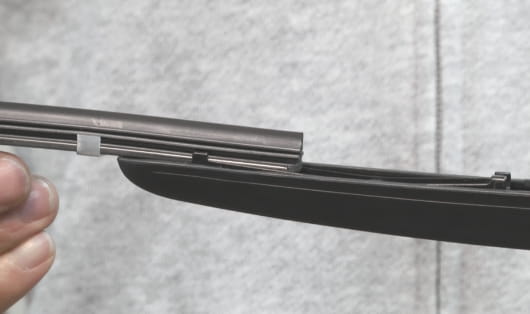
STEP 04
Insert new wiper rubbers.
Insert the old rubber from the side without the lock hole.
-
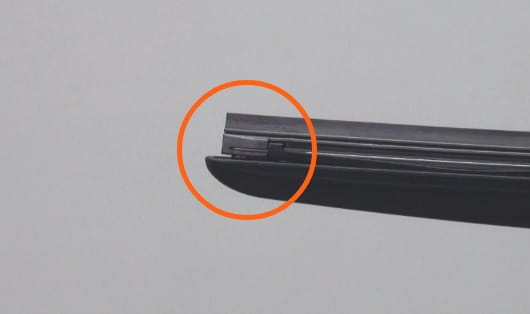
STEP 05
Insert the blade claws into the rubber.
Insert the claws into the locking holes.
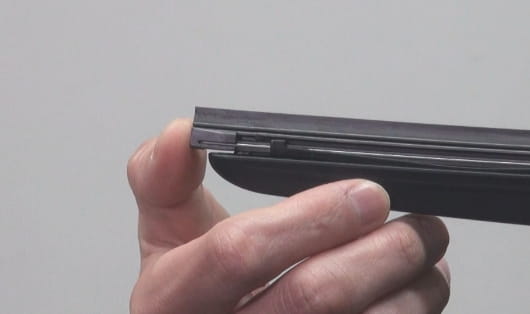
Make sure metal rails are not displaced.
-
STEP 06
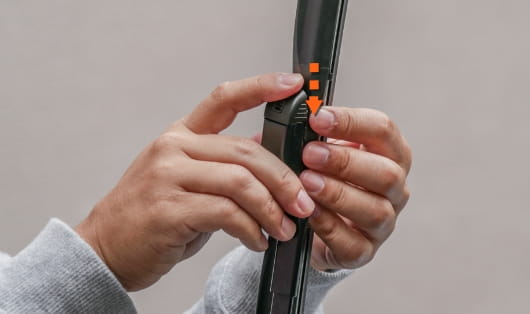
Attach the blade to the arm and you're done!
Insert the wiper blade into the wiper arm until it clicks into place.

Slide the tip part of the adapter in the direction of the arrow until it clicks into place and locks into place.
-
STEP 01
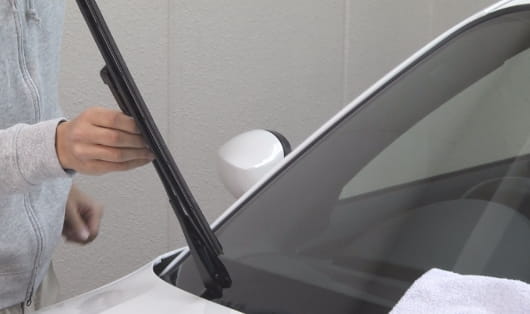
Stand the arm up.
Remove and work on the wiper blades.
-
STEP 02
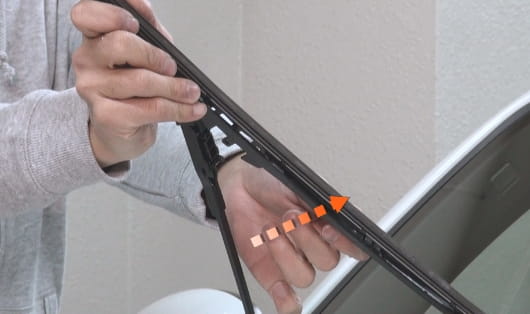
Remove the blade.
Remove it with force in the direction of the arrow.
-
STEP 03
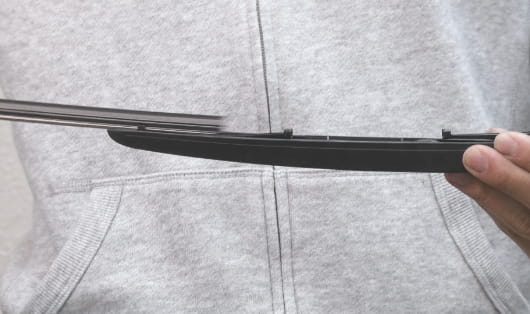
Pull out the old wiper rubber.
Pull it out with the metal rail from the side with the lock hole.
-
STEP 04
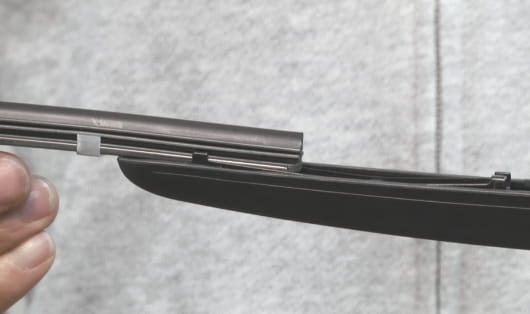
Insert new wiper rubbers.
Insert the old rubber from the side without the lock hole.
-
STEP 05
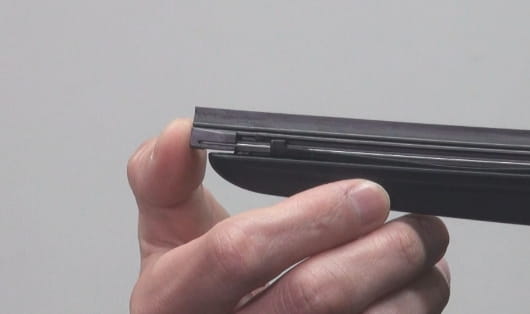
Insert the blade claws into the rubber.
Insert the claws into the locking holes.
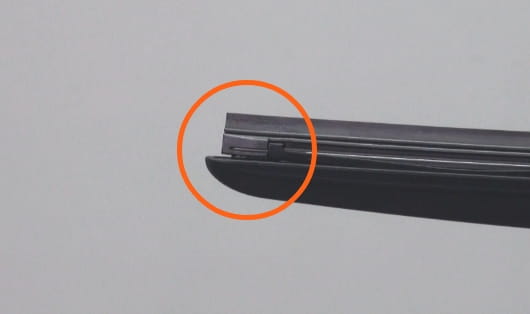
Make sure metal rails are not displaced.
-
STEP 06
Attach the blade to the arm and you're done!
Attach the blade to the arm and the work is complete.
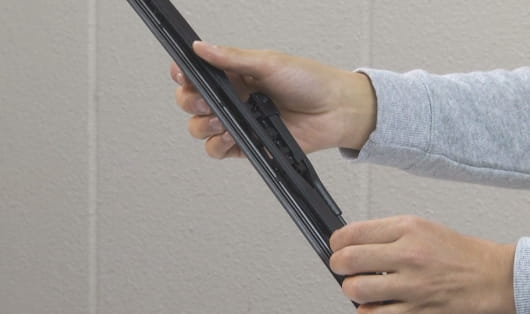
-
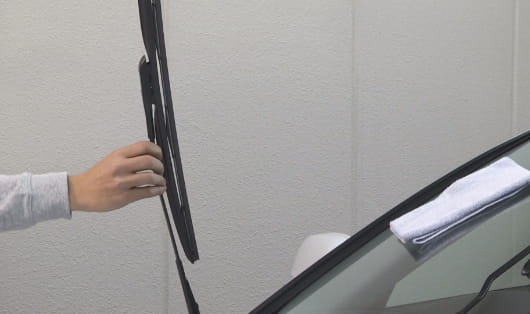
STEP 01
Stand the arm up.
Remove and work on the wiper blades.
-
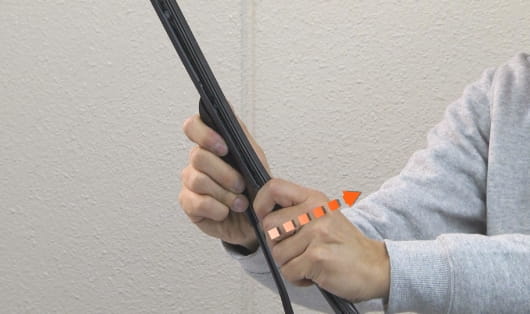
STEP 02
Remove the blade.
Remove it with force in the direction of the arrow.
-
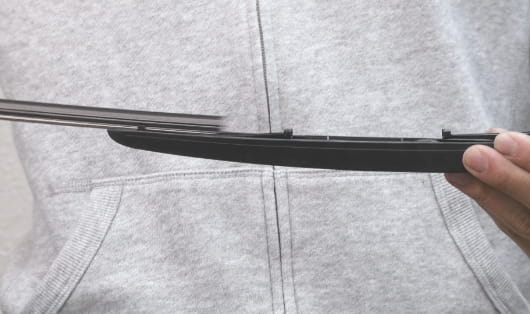
STEP 03
Pull out the old wiper rubber.
Pull it out with the metal rail from the side with the lock hole.
-
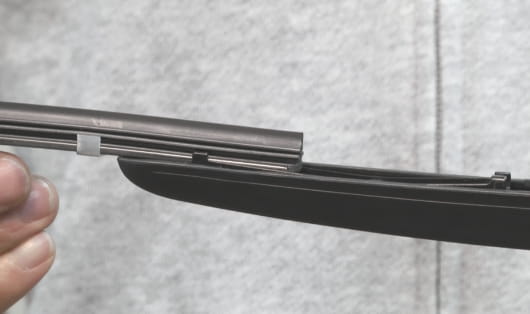
STEP 04
Insert new wiper rubbers.
Insert the old rubber from the side without the lock hole.
-
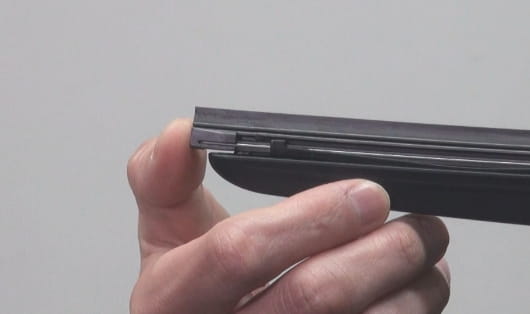
STEP 05
Insert the blade claws into the rubber.
Insert the claws into the locking holes.
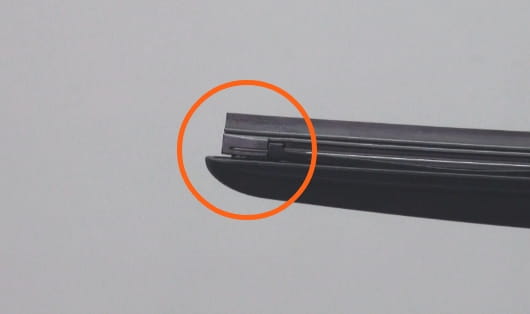
Make sure metal rails are not displaced.
-
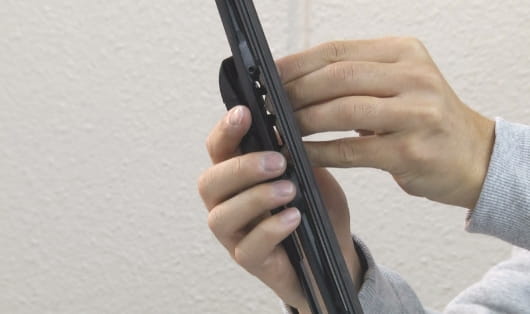
STEP 06
Attach the blade to the arm and you're done!
Attach the blade to the arm and the work is complete.
-
STEP 01
Stand the arm up.
Remove and work on the wiper blades.

-
STEP 02
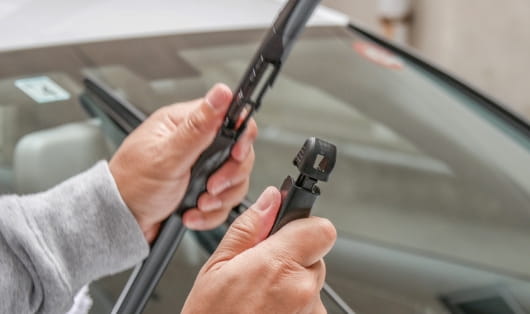
Remove the blade.
Slide the tip part of the adapter to unlock it.

Remove the wiper blades.
-
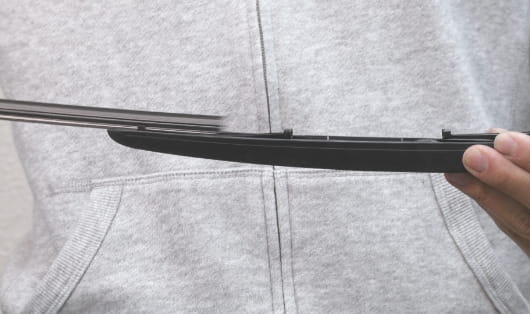
STEP 03
Pull out the old wiper rubber.
Pull it out with the metal rail from the side with the lock hole.
-
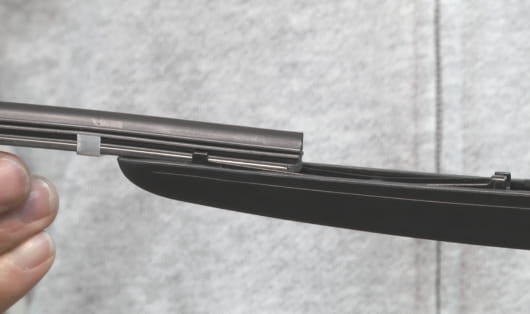
STEP 04
Insert new wiper rubbers.
Insert the old rubber from the side without the lock hole.
-
STEP 05
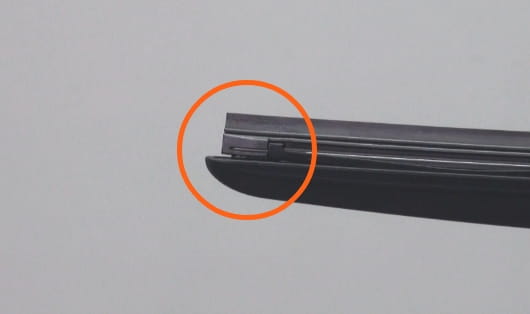
Insert the blade claws into the rubber.
Insert the claws into the locking holes.
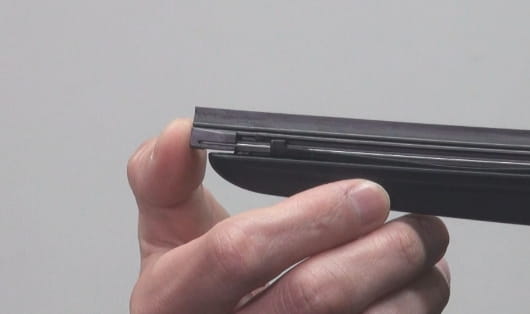
Make sure metal rails are not displaced.
-
STEP 06
Attach the blade to the arm and you're done!
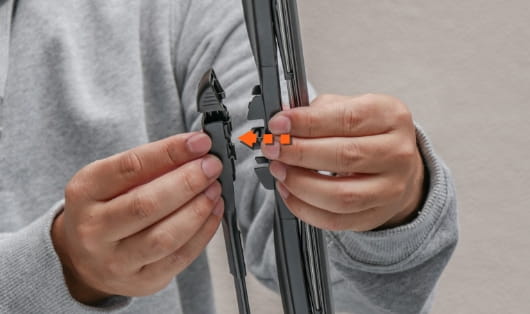
Insert the wiper blade into the wiper arm until it clicks into place.
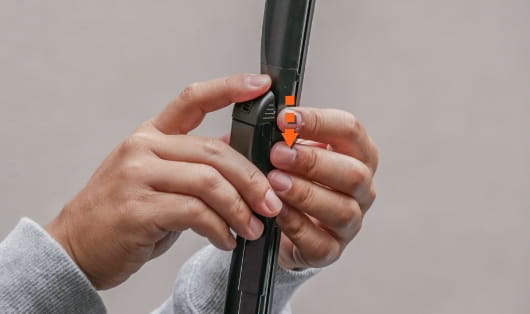
Slide the tip part of the adapter in the direction of the arrow until it clicks into place and locks into place.
-
STEP 01
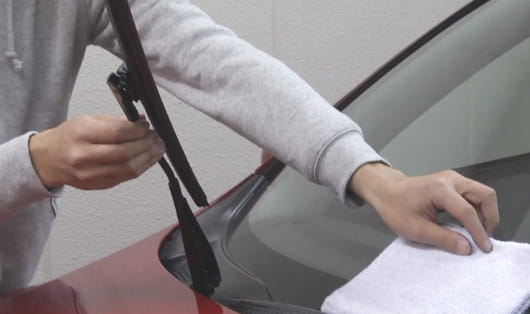
Stand the arm up.
Remove and work on the wiper blades.
-
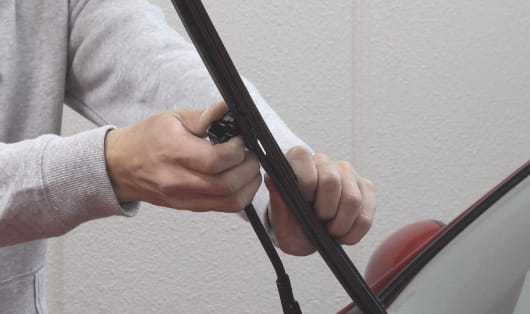
STEP 02
Remove the blade.
Remove the wiper blade with a slight twist.
-
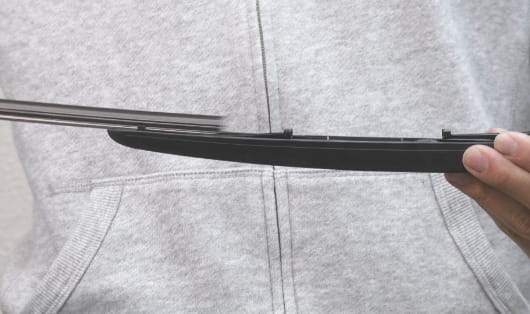
STEP 03
Pull out the old wiper rubber.
Pull it out with the metal rail from the side with the lock hole.
-
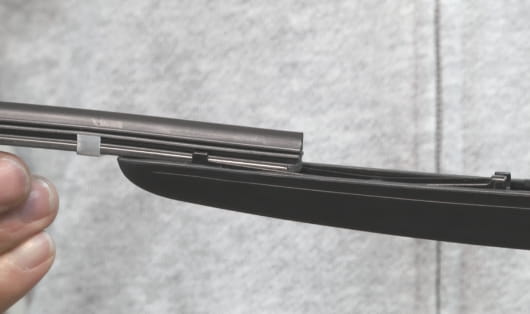
STEP 04
Insert new wiper rubbers.
Insert the old rubber from the side without the lock hole.
-
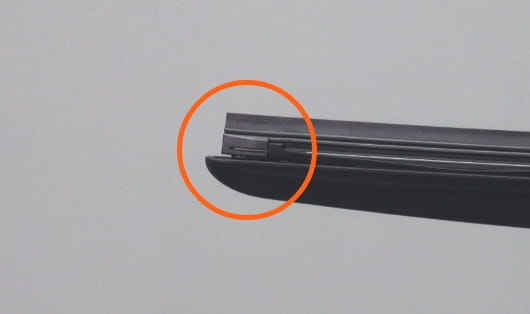
STEP 05
Insert the blade claws into the rubber.
Insert the claws into the locking holes.
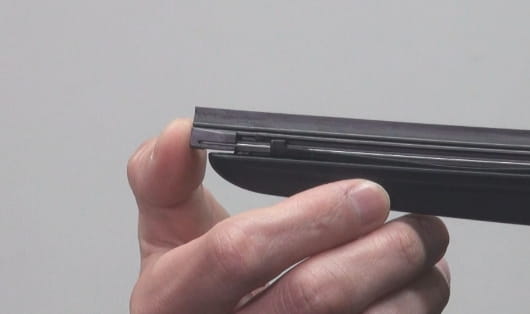
Make sure metal rails are not displaced.
-
STEP 06
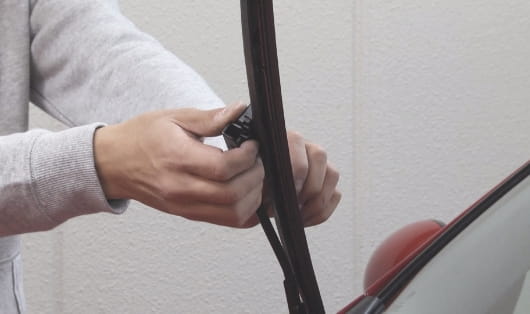
Attach the blade to the arm and you're done!
Attach the blade to the arm and the work is complete.
-
STEP 01
Stand the arm up.
Remove and work on the wiper blades.

-
STEP 02
Remove the blade.
Remove the wiper blade with a slight twist.

-
STEP 03
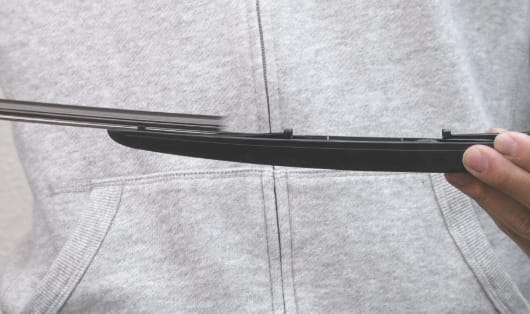
Pull out the old wiper rubber.
Pull it out with the metal rail from the side with the lock hole.
-
STEP 04
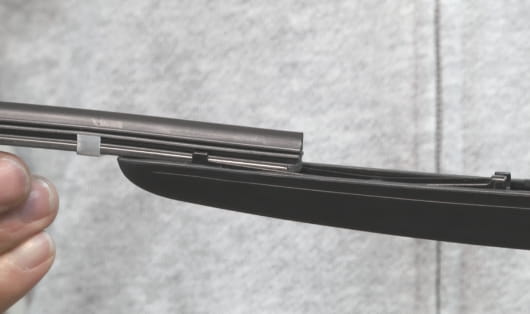
Insert new wiper rubbers.
Insert the old rubber from the side without the lock hole.
-
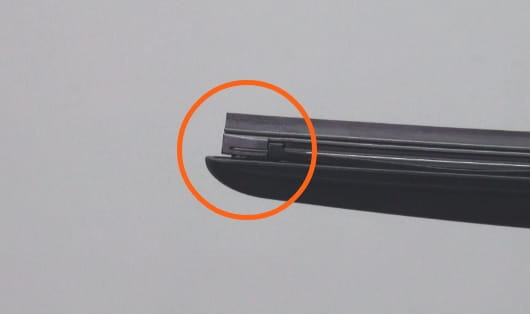
STEP 05
Insert the blade claws into the rubber.
Insert the claws into the locking holes.
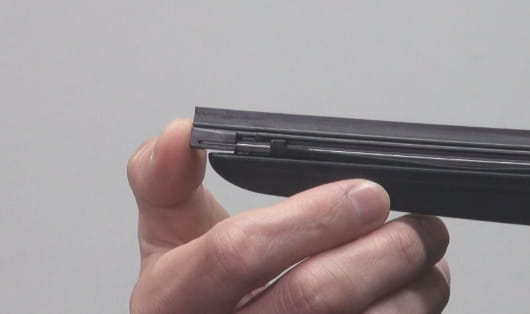
Make sure metal rails are not displaced.
-
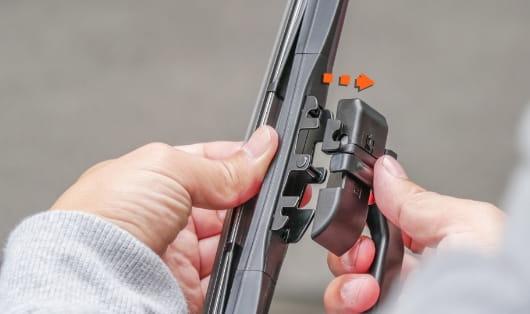
STEP 06
Attach the blade to the arm and you're done!
Attach the blade to the arm and the work is complete.
-
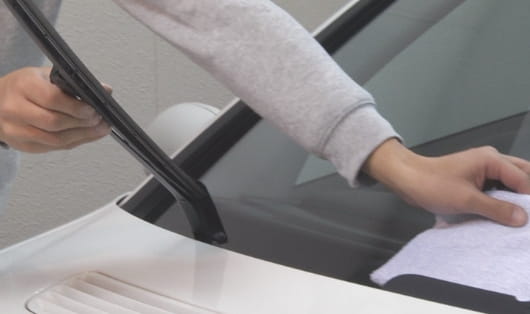
STEP 01
Stand the arm up.
Remove and work on the wiper blades.
-
STEP 02
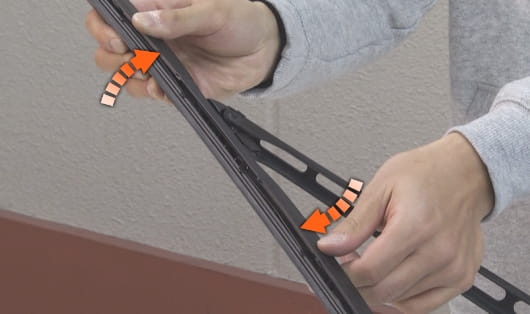
Remove the blade.
Rotate the wiper blade to unlock the adapter. Open the cover of the adapter and remove it from the wiper arm.
-
STEP 03
Pull out the old wiper rubber.
Pull it out with the metal rail from the side with the lock hole.

-
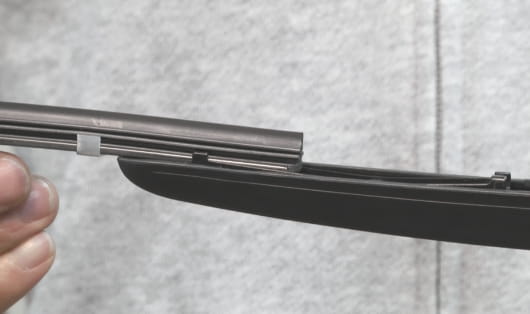
STEP 04
Insert new wiper rubbers.
Insert the old rubber from the side without the lock hole.
-
STEP 05
Insert the blade claws into the rubber.
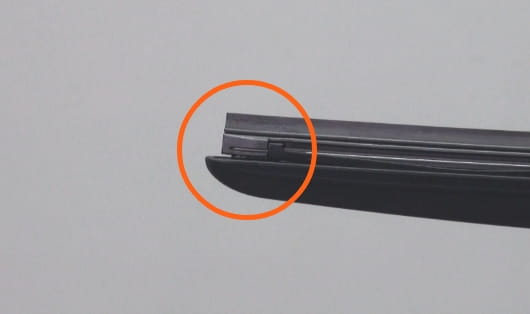
Insert the claws into the locking holes.
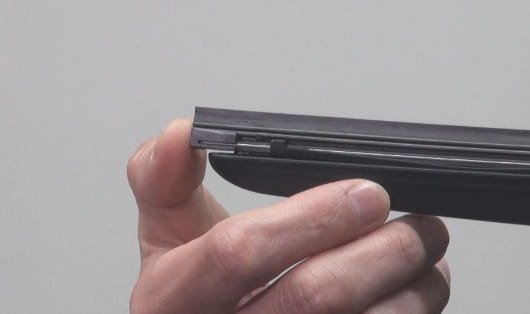
Make sure metal rails are not displaced.
-
STEP 06
Attach the blade to the arm and you're done!
Attach the blade to the arm and the work is complete.
